This manual takes you from your first paste to the finest settings. It is organised in six levels: the first two are enough for everyday use; the others are there when you need them.
Each chapter starts with its goal and often ends with “Try it yourself”: an exercise you can do without risk, in the extension’s panel, which sends nothing to any site. All the examples are made up: never practise with real data.
Token names stay in French whatever the interface language: a person becomes [PERSONNE_1], a phone number [TELEPHONE_1]. Your own types keep the name you give them, such as [CUSTOMER_ID_1].
Level 1 — Getting started
Understand the idea, install the extension, try it out and read an answer. Allow a quarter of an hour.
The idea in one minute
Goal: Know what ChatMasqué does, and what the AI actually sees.
You want help from an AI assistant (ChatGPT, Claude, Gemini…) without handing it the personal data of your clients, patients or colleagues. When you paste a text, ChatMasqué replaces that data with tokens: labels such as [PERSONNE_1] or [EMAIL_1].
| You paste | The AI receives |
|---|---|
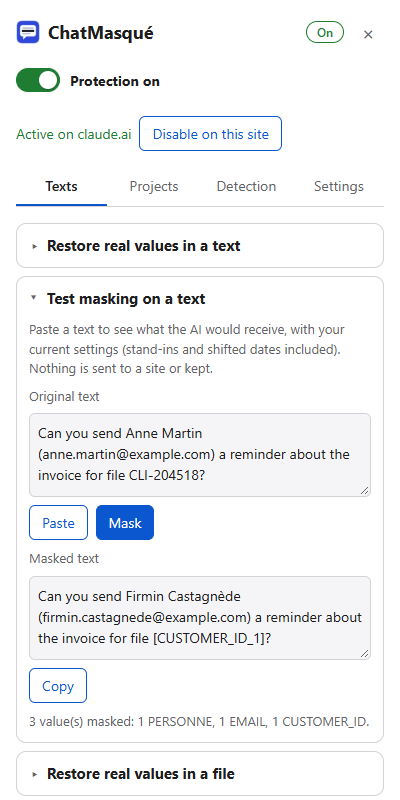
| Can you send Anne Martin (anne.martin@example.com) a reminder about the invoice for file CLI-204518? | Can you send [PERSONNE_1] ([EMAIL_1]) a reminder about the invoice for file [CUSTOMER_ID_1]? |
The AI works on the masked text and answers with the same tokens. On your screen, ChatMasqué puts the real values back. The AI site never sees them.
- Everything happens on your computer: no server, no account, no statistics sent.
- The mapping between each token and its real value is kept, encrypted, on your computer, for the current conversation.
- The extension’s only connection: a one-time download of the model that recognises names of people, places and organisations.
Installing the extension
Goal: Have ChatMasqué in your browser, ready to use.
Chrome or Edge
- Open ChatMasqué’s page on the Chrome Web Store or on Edge Add-ons.
- Click Add to Chrome (or Get in Edge), then confirm.
- Pin the icon: click the puzzle piece to the right of the address bar, then the pin next to ChatMasqué.
Updates are then automatic.
Firefox
Firefox 128 or later: ChatMasqué will soon be available on addons.mozilla.org. The panel will then open in Firefox’s sidebar.
The first paste
On first use, the extension downloads its name recognition model (about 140 MB, once only). Meanwhile, e-mail addresses, IBANs, phone numbers and other numbers are already masked; a notification warns you that names are not masked yet. Progress is shown in Settings › Engine.
Getting to know the panel
Goal: Know where to find each feature.
Click ChatMasqué’s icon: the panel opens at the side of the window. At the top, always visible:
- Protection on: turns the extension off or on everywhere.
- Active on … and Disable on this site: the state on the site in the open tab. The icon also shows ON or OFF.
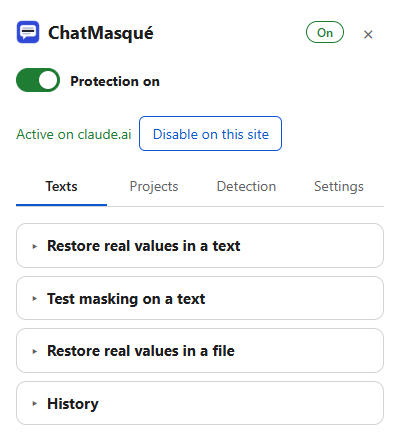
Below, four tabs group sections that open with a click on their title:
| Tab | What you find there |
|---|---|
| Texts | Restore real values in a text or a file; test masking; history |
| Projects | Workspaces; mask a file |
| Detection | Data to mask; custom entities; remembered corrections |
| Settings | Settings; sites; engine; performance; data and backup |
Practising without risk
Goal: See what the AI would receive, without sending anything to anyone.
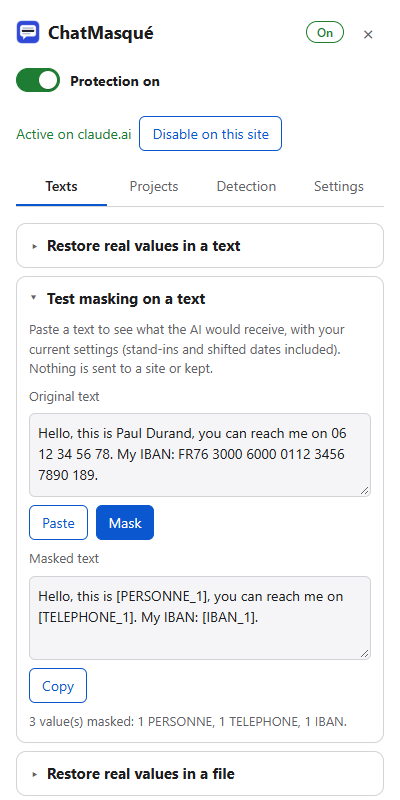
Before your first real paste, try it out in the panel: the Test masking on a text section applies your settings to a text and shows the result. Nothing is sent to a site, nothing is kept.
- Open the Texts tab, then the Test masking on a text section.
- Paste or type a sample text in Original text.
- Click Mask: the Masked text appears below, with the number of masked values by type.
Your first paste
Goal: Send a masked text to an AI assistant.
- Open an AI site, for example ChatGPT, Claude or Gemini.
- Copy your text as usual (Ctrl+C).
- Paste it into the message box (Ctrl+V): it arrives already masked.
- Read the notification at the bottom of the screen: it sums up what was masked (“3 values masked”).
- Send your message.

Reading the AI’s answer
Goal: See the answer with the real values, on your screen only.
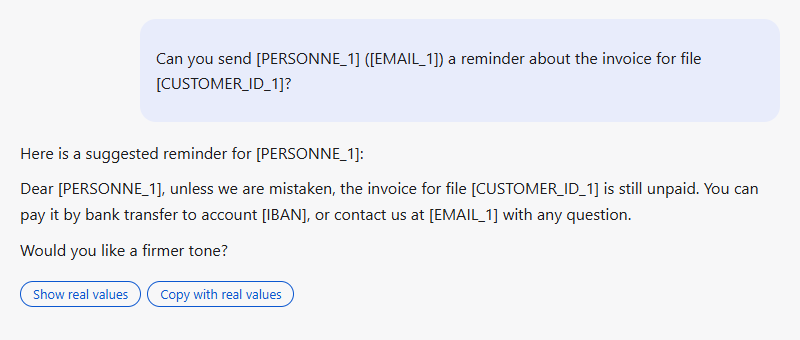
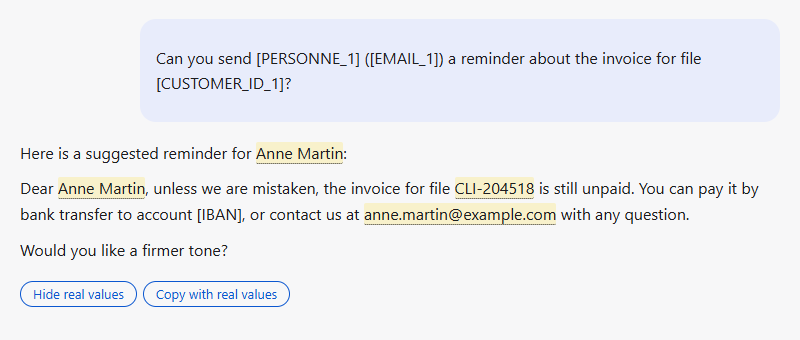
The AI answers with the tokens. Once its answer is complete, two buttons appear below it:
- Show real values: puts them back in place on screen; a second click hides them again.
- Copy with real values: puts the answer on the clipboard with the real values, ready to paste into a document or an e-mail.
Two shortcuts
- Alt+Shift+V shows or hides the real values in all the answers on the page.
- Select a passage, right-click, then Show real values here: handy when an answer has no button.
Level 2 — Everyday use
Check what is sent, type safely, reuse answers, understand ChatMasqué’s messages, and catch what detection misses.
Check before sending: the preview
Goal: Review each paste, add or remove a value.
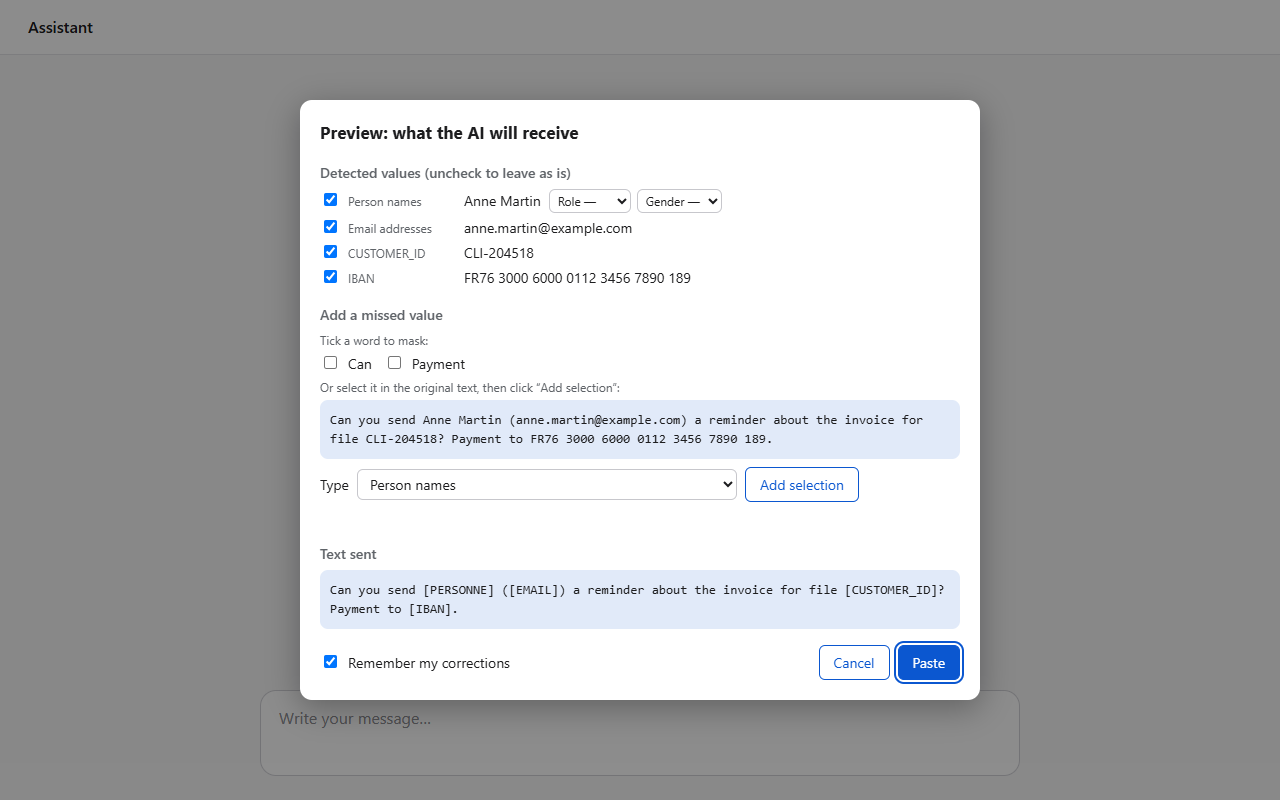
Turn on Preview before pasting (Settings tab, Settings section). With each paste, a window then shows what the AI will receive, before anything reaches the page:
- untick a value to leave it as is (an unimportant city name, for example);
- add a missed value: tick a suggested word, or select it in the original text, then click Add selection and choose its type;
- tick Remember my corrections so ChatMasqué remembers them next time;
- click Paste (or Enter), or Cancel (or Escape): nothing is pasted.
Typing on the keyboard
Goal: Avoid sending personal data you typed by hand unmasked.
Masking every keystroke would break the sites’ editors, so typed text is not masked automatically. Instead, at each pause, ChatMasqué analyses the input box. If personal data appears there, a warning says so and offers to Mask the whole content of the box.

Each value is only flagged once. The warning can be turned off in Settings › Settings (Warn when personal data is typed).
Masking a word detection missed
A client’s name, an internal code: ChatMasqué did not spot it? Mask it yourself, in the input box:
- Select the word (double-click, or with the mouse).
- Right-click, then Mask the selection and choose its type: Person, Organization, Place or Other (reference, identifier).
- The word becomes a token. The notification offers Always mask: one click, and this value will be masked automatically in future pastes.
| You paste | The AI receives |
|---|---|
| Follow up with Zorglub Industries before Friday. | Follow up with [ORGANISATION_1] before Friday. |
Reusing an answer elsewhere
Goal: Get the real values back in a document, an e-mail or a draft.
Copying the answer
The simplest way: Copy with real values, below the answer. Then paste wherever you like: Word, your e-mail…
A text copied with its tokens
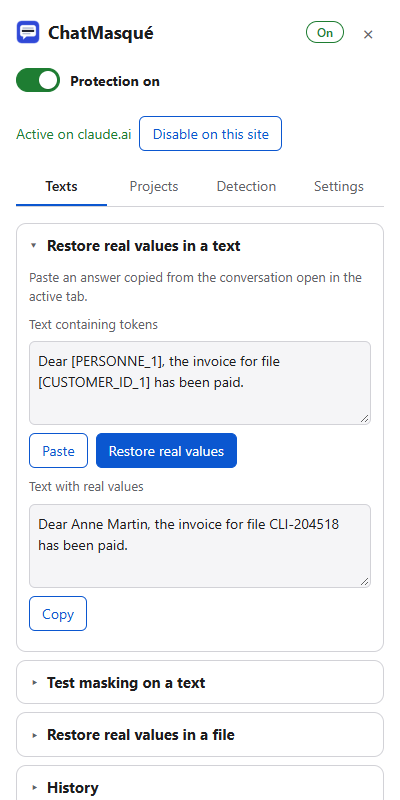
Did you copy an answer with its tokens? Open the conversation in the active tab, then, in the panel, Texts tab, Restore real values in a text section: paste the text (Paste button), click Restore real values, then Copy.
E-mail drafts suggested by the AI
When the AI prepares an e-mail in a draft card (ChatGPT, Gemini), three buttons are added:
- View with real values: a window, visible to you alone, shows the full draft; you can Copy it. The site’s draft keeps its tokens.
- Insert real values into the draft: writes them into the draft, after confirmation, so you can send it from the site. The site and the recipient will then see them: this is the only case where they leave your screen.
- Put the tokens back into the draft: goes back, even if you have changed the rest of the text.
When ChatMasqué stops you
Goal: Understand the safety messages and know what to do.
ChatMasqué’s rule: when in doubt, nothing is sent unmasked. Here are the situations where it prefers to block, and what to do.
“ChatMasqué does not recognise this input area”
The pasted or dropped text was aimed at an area the extension cannot read (closed editor, unusual component). Rather than let it through, the extension blocks it. Paste it into the site’s main message box; if this blocking gets in your way on that site, turn ChatMasqué off there.

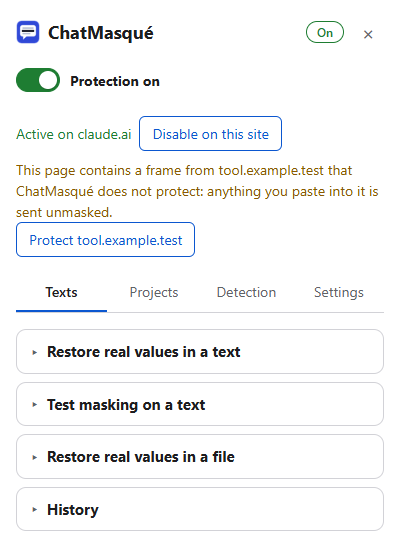
A frame from another domain
Some pages embed a frame coming from another site (an editor, a form). ChatMasqué does not act there until that domain is enabled. The panel flags it and offers Protect …: accept the permission requested by the browser, then reload the page.
“The extension was updated, reload the page”
After an update, tabs that were already open must be reloaded (F5). Until then, pastes are blocked.
What ChatMasqué does not see
Goal: Know the limits, so you are not caught off guard.
ChatMasqué masks what you paste, drop or type into the page, and the files you attach to it (if the option is on). It does not see:
- the “Paste” button some sites have, which reads the clipboard directly: paste with Ctrl+V instead;
- files imported from Google Drive, OneDrive or a web address: download them first, then attach them from your computer;
- what an image or a screenshot shows: it is up to you to black out sensitive areas before sending (level 3);
- voice dictation.
When detection gets it wrong
Goal: Know how to catch missed data, before and after sending.
No tool spots 100% of personal data: a rare name, a code specific to your line of work or an unusual format can slip through. ChatMasqué therefore does not rely on detection alone. Several safety nets catch what it misses:
| When | The safety net | What it does |
|---|---|---|
| Before sending | Preview before pasting | Shows each value found: add a missed word, remove a wrong detection. Your organisation can make it mandatory. |
| Before sending | Mask the selection | Right-click a word in the input box: it becomes a token (see “Typing on the keyboard”). |
| Before sending | Typing warning | Flags personal data typed by hand, with a button to mask it. |
| After sending | Learning mode | At the end of its answer, the AI lists what it thinks was left in clear text; one click adds it to “Always mask” (level 5). |
| From then on | Always mask | Your clients, patients or employees, imported from a file, are masked everywhere (level 4). |
| For the organisation | Enforced entities and settings | Your IT department adds its own identifiers and enforces the settings on every computer (level 6). |
Level 3 — Documents and projects
Give a file or an image to the AI, get back a file it produces, and keep the same tokens throughout a project.
Attaching a file safely
Goal: Send the AI a file whose data is masked.
Automatically, when you drop it
Turn on Mask files dropped on AI sites (Settings › Settings). When you attach a file (paper clip or drag and drop), the site receives a masked Markdown file with a neutral name instead.
- Formats: text, Markdown, CSV, HTML, Word, Excel, PowerPoint and PDF containing text (20 MB max).
- Several files dropped together share the same tokens and are numbered (…-1.md, …-2.md).
- In a table (Excel, CSV), names under a “Name”, “First name” or “Client” header are masked even when alone in their cell.
- An unsupported format is sent as is: a notification says so. Scanned PDFs (with no text) are refused. Images follow their own rules (next chapter).
By hand, from the panel
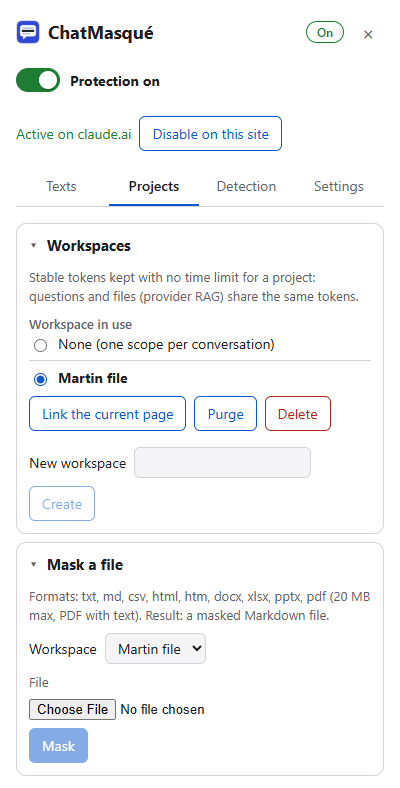
- Projects tab, Mask a file section.
- Choose the workspace (see below) and the file, then click Mask.
- Download the masked file and drop it on the AI site.
Sending an image or a screenshot
Goal: Black out what must not leave, before the AI sees the image.
ChatMasqué does not read what an image shows: a name, a face or a photographed document stays visible. When you paste or drop an image on an AI site, an Image sent to the AI window therefore opens before sending:
- draw rectangles with the mouse over what must not leave: these areas will be blacked out, pixels replaced, not blurred;
- with the keyboard: arrows to move the frame, Shift+arrows to resize it, Enter to black out, Delete to remove the last area;
- click Send, or Cancel (Esc): nothing is sent.
The image is always sent under a neutral name (“image-20261114-093012.png”) and, for JPEG, PNG or WebP, without its metadata: GPS location, device, date taken.
Getting back a file produced by the AI
Goal: Get a final document with the real values.
Did you ask the AI for a letter, a spreadsheet or a presentation? The file it returns contains tokens. Keep the conversation open in the active tab, then:
- Texts tab, Restore real values in a file section.
- Choose the file produced by the AI.
- Click the Download link: you get, for example, “letter (real values).docx”.
- Formats: Word, Excel, PowerPoint, text, Markdown, CSV, HTML, JSON and code. A PDF cannot be edited: ask the AI for a Word file instead.
- Formatting is kept (bold, styles, tables, images).
- Tokens unknown to this conversation are left as they are and listed.
- The file is read and rewritten on your computer: it is not sent anywhere.
Workspaces
Goal: Keep the same tokens throughout a project, with no time limit.
By default, each conversation has its own tokens, deleted after a few days. For a case followed over weeks, or an AI project that contains files (ChatGPT Projects, Gemini Gems, NotebookLM), create a workspace: your questions and your files will all refer to the same [PERSONNE_1].
- Projects tab, Workspaces section: enter a name (“Martin file”), then Create.
- Open the project’s page on the AI site and click Link the current page: the workspace will apply to all the conversations in that project.
- Or choose it as the Workspace in use: it then applies everywhere, until you switch back to “None”.
At the end of an assignment, two buttons next to the workspace: Purge erases its mappings but keeps the workspace (tokens start again from [PERSONNE_1]); Delete erases the workspace and its mappings. Either way, tokens already sent can no longer be restored.
Level 4 — Tailoring detection to your work
Choose what is masked, correct detection, and teach ChatMasqué your own types of data.
Choosing the data to mask
Goal: Only mask what matters to you.
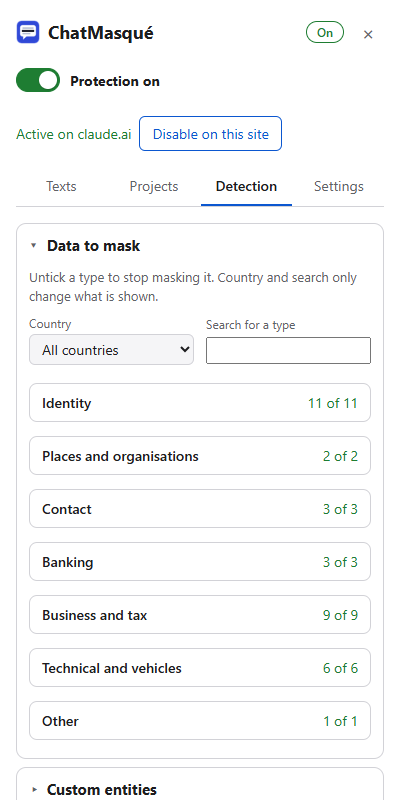
Detection tab, Data to mask section: untick a type to stop masking it. For example, untick places if you are asking for help with a route.
Correcting detection
Goal: Get a missed value masked, or let through a word masked by mistake.
Detection tab, Remembered corrections section, two lists:
- Always mask: a value detection misses (a client’s name, a sensitive product name);
- Never mask: a word masked by mistake (your company’s name, a technical term).
They are filled from the preview (Remember my corrections box) or by hand, and apply everywhere: paste, typing, files.
Importing a whole list
- Choose the type of the values, or New token name… and type CLIENT, for example.
- Import your list: TXT file (one value per line), CSV or Excel; up to 1,000 values. Tick The first line contains column titles if that is the case.
| You paste | The AI receives |
|---|---|
| The contract with Durand Brothers expires soon. | The contract with [CLIENT_1] expires soon. |
Finding and exporting your corrections
- Beyond ten values, a Search for a value or a type field filters both lists; only the first 20 are shown, then Show the other ….
- Export my corrections (Excel) produces a file with two sheets (“Toujours masquer”, with the types, and “Jamais masquer”). Imported back in the same place, on this computer or another, it restores both lists.
Templates by profession
Goal: Install the numbers specific to your profession in one click.
Detection tab, Custom entities section, Templates by profession part: click Add next to a template.
| Template | What it masks |
|---|---|
| Healthcare | RPPS (with check digit), ADELI, patient identifier (IPP) |
| Legal | RG number, Portalis number, public prosecutor’s number |
| Human resources | employee number (matricule) |
These templates cover French identifiers. Short numbers are only masked near a word that introduces them (“matricule”, “IPP”, “RG”): a date or an amount is left alone.
Creating your own type of data
Goal: Mask an in-house identifier, for example a file number.
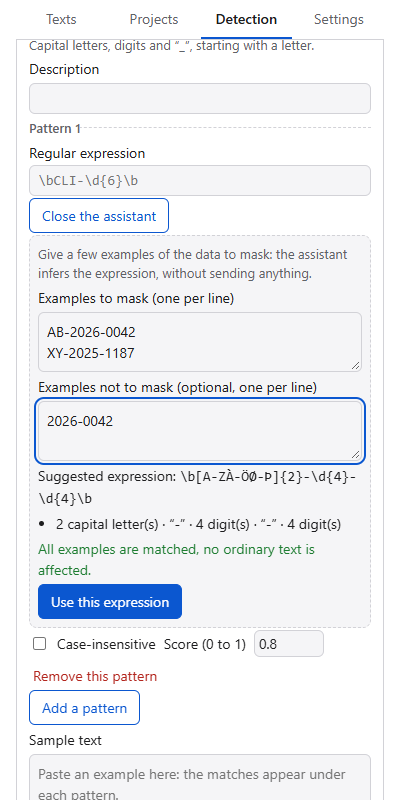
Example: your files are numbered CLI-204518, CLI-377120… You want them to become [CUSTOMER_ID_1]. No need to know regular expressions: the assistant infers them from your examples.
- Detection tab, Custom entities section: click New entity.
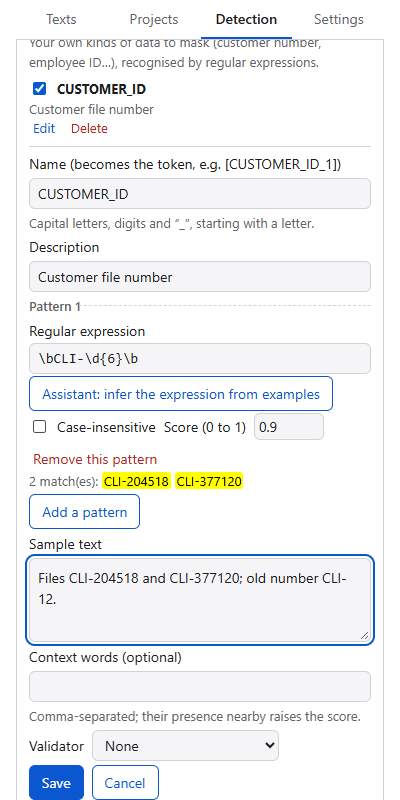
- Give it a name in capitals: CUSTOMER_ID (it will become the token).
- In the assistant, type a few examples, one per line, and if needed examples not to mask.
- Read the suggested explanation (“CLI-” · 6 digit(s)) and check that no ordinary text is affected, then click Use this expression.
- Paste an example into Sample text: the matches appear under the pattern. Finally, click Save.
| Field | Purpose |
|---|---|
| Name | becomes the token: CUSTOMER_ID gives [CUSTOMER_ID_1]. Capitals, digits and “_”. |
| Regular expression | the pattern to recognise, suggested by the assistant (you can adjust it). |
| Score | from 0 to 1: how confident the pattern is. Below the detection threshold, it is not masked. |
| Context words | optional: words that raise the score when they are nearby (“client”, “file”). |
| Validator | optional: a check digit to verify (IBAN, Luhn…). |
Sharing your rules with colleagues
Goal: Give a whole team the same detection.
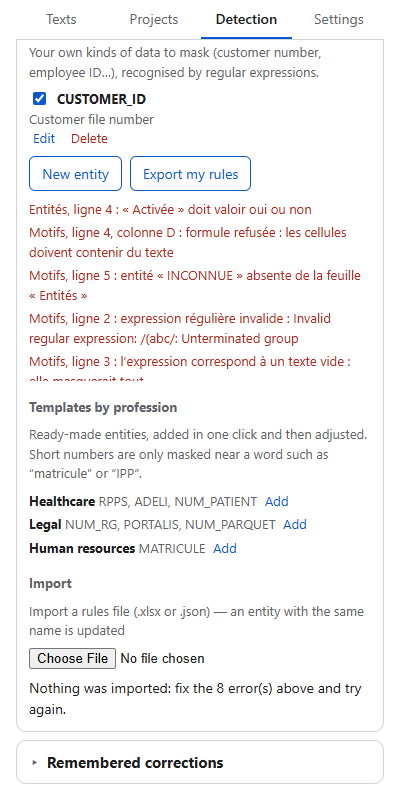
Import, export section: Export my rules produces an Excel workbook or a JSON file. Your colleagues import it on their side; an entity with the same name is updated.
The workbook’s sheets and columns keep their French names, whatever the interface language:
| Excel sheet | Columns |
|---|---|
| Entités (entities) | Nom, Description, Activée (oui/non), Contexte (words separated by “;”), Validateur |
| Motifs (patterns) | Entité, Nom, Expression, Options (i: case-insensitive), Score |
| Paramètres (settings) | Paramètre, Valeur (threshold, preview, retention, history, files) |
If the file contains an error, nothing is imported: each error gives the sheet and the line to fix.
Level 5 — Working better with the AI
Options that make the AI’s answers more natural and more accurate, without revealing your data to it.
The notes added to the text
Goal: Know what ChatMasqué adds to your messages, and add your own instructions.
When you paste, ChatMasqué can add short instructions to the masked text: input instructions before the text (how to handle what you send) and output instructions after it (how to write the answer). Each one is added only once per conversation: if the conversation already shows it, it is not repeated.
Before the text (input)
- Ask the AI to keep tokens unchanged (on by default): the AI copies the tokens exactly. Without this instruction, it sometimes writes “[PERSONNE 1]” or invents a name, and the real value can no longer be restored.
- Do not remember anything from the conversation (on by default): assistants with a memory across conversations (ChatGPT, Gemini, Claude) must not keep data that slipped past masking. Added only if the text contained masked data.
- Protect against hidden instructions in long pasted texts (off by default): a text longer than 600 characters is wrapped in <document> tags, and the AI is told that it is data to process, not instructions. Useful if you paste e-mails or web pages that might contain booby-trapped instructions.
- My input instruction: your own text, for example “Answer in English, in a formal tone” or “You are a lawyer specialising in Swiss employment law”.
The legend of people (“[PERSONNE_1]: client”), if enabled, also goes before the text (see “Stating people’s gender and role”).
After the text (output)
- Do not ask for personal data (on by default): instead of asking you for a number or an address that you would type in clear text, the AI leaves a “(to be completed)” field. Added only if the text contained masked data.
- Learning mode: have the AI flag data left in clear text (off by default): at the end of its answer, the AI lists the personal data ChatMasqué did not mask. Below the answer, an Always mask button adds them to your corrections. Check each line: the AI can be wrong.
- My output instruction: your own text, for example “End with a list of actions to take” or “No more than ten lines”.
Changing the instructions
Everything is in Settings › Instructions to the AI. The text of the built-in instructions (do not remember, hidden instructions, learning mode, do not ask) can be rewritten your way; Restore the original text brings back the supplied version. The technical part, needed for ChatMasqué to work, stays fixed: keeping tokens unchanged and the format of the learning-mode list. Each instruction is limited to 1,000 characters.
Stand-ins: plausible fake names
Goal: Get natural answers, with the right gender agreement.
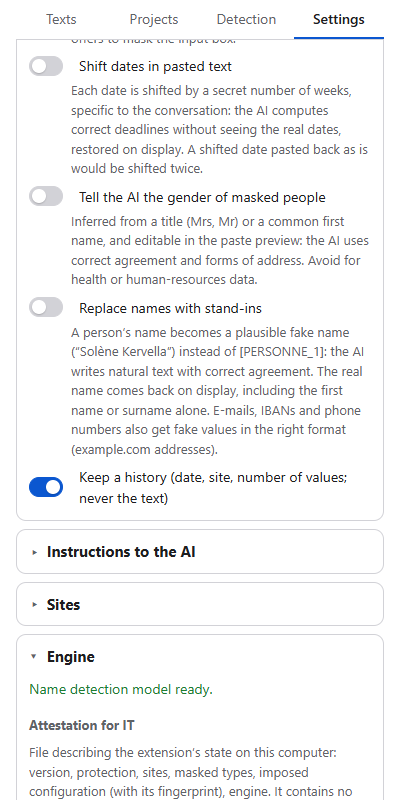
With Replace names with stand-ins (Settings › Settings), a person’s name becomes a plausible fake name instead of a token. The AI then writes natural text; the real name comes back on display, including when the AI only uses the first name or the surname. E-mail addresses, IBANs and phone numbers also get fake values in the right format.
Shifting dates
Goal: Let the AI work out deadlines without seeing the real dates.
With Shift dates in pasted text, each date is shifted by a secret number of weeks, the same for the whole conversation. The gaps between dates stay correct: the AI can work out a deadline or a due date. The real dates come back on display.
| You paste | The AI receives |
|---|---|
| Hearing on 3 March 2026, submissions due two weeks before. | Hearing on 14 April 2026, submissions due two weeks before. |
Stating people’s gender and role
Goal: Help the AI use the right forms and address each person correctly.
With Tell the AI the gender of masked people, ChatMasqué adds a short key, inferred from a title (Mrs, Mr) or a common first name. In the preview, you can correct the gender and state a role (client, patient, employee, lawyer…).
| You paste | The AI receives |
|---|---|
| Mrs Anne Martin wrote yesterday. | Mrs [PERSONNE_1] wrote yesterday. Pseudonym key: [PERSONNE_1]: woman |
Level 6 — Managing and securing
Settings, sites, backing up your mappings, and use in a company.
Settings
Goal: Know each setting and its default value.
| Setting | Effect | Default |
|---|---|---|
| Preview before pasting | check each paste before sending (level 2) | off |
| Pattern detection threshold | lower: more values masked, and more mistakes | 0.50 |
| Keep mappings for | how long real values can be restored: 1, 7, 30 or 90 days | 7 days |
| Warn when personal data is typed | warning, with the Mask button (level 2) | on |
| Ask the AI to keep tokens unchanged | note added once per conversation (level 5) | on |
| Do not remember anything from the conversation | input instruction, if the text contained masked data (level 5) | on |
| Do not ask for personal data | output instruction: the AI leaves a field to complete (level 5) | on |
| Protect against hidden instructions | <document> tags around long pasted texts | off |
| Learning mode | the AI flags data left in clear text (level 5) | off |
| My input and output instructions | your own texts, sent without masking (level 5) | empty |
| Mask files dropped on AI sites | the site receives a masked file instead of yours (level 3) | off |
| Stand-ins, shifted dates, gender | level 5 options | off |
| Keep a history | date, site and number of masked values; never the text | on |
| Language | French, English, German, Italian, Spanish, Arabic, or the browser’s | browser |
| Colours | neutral theme or the colours of Côte d’Ivoire, Senegal, France, Switzerland, Spain, Italy, Germany, Morocco, the United States | neutral |
Supported sites
Goal: Know where ChatMasqué acts, and turn it on elsewhere.
ChatMasqué acts out of the box on ChatGPT, Claude, Gemini, NotebookLM, Microsoft Copilot, Microsoft 365 Copilot (chat page only, never Outlook or Word online), Le Chat (Mistral), Perplexity, DeepSeek, Qwen, Kimi, Grok, Meta AI, Apertus and HuggingChat. The list, with a box per site, is in Settings › Sites.
- For another AI site, open it in a tab.
- In the panel, click Enable on this site.
- Accept the permission requested by the browser, for that site only, then reload the page.
Only encrypted sites (https address) are supported.
Backing up and changing computer
Goal: Get your real values back elsewhere, or after reinstalling.
- Settings tab, Data section: choose a passphrase (at least 12 characters, entered twice).
- Click Create the backup, then download the file and keep it somewhere safe.
- On the other computer: choose that file, enter the same passphrase, then Restore.
- Reopen your conversations: mappings, remembered corrections and workspaces are back.
Deleting your data
The Delete all data button deletes the mappings and the history: tokens already sent can no longer be restored. Uninstalling the extension also deletes all its data.
In a company
Goal: Understand what your IT department can set for you.
If your organisation manages your browser, it can impose settings (including how images are handled), entities and the sites where the extension always stays active. A banner says so at the top of the panel, and those settings are greyed out with the words “set by your organisation”.
Engine section, Create the attestation: a file that describes the extension’s state on your computer (version, protection, sites, imposed settings), with no personal data at all. Pass it on to your IT department if they ask for it: the extension itself sends nothing.
Appendix A — Detected data
| Category | Examples |
|---|---|
| Identity | names of people, dates of birth, social security numbers (FR), national register (BE), AVS (CH), DNI and NIE (ES), codice fiscale (IT), Steuer-ID (DE), passports |
| Places and organisations | cities, full postal addresses (number, street, postcode, city), companies, public bodies |
| Contact | e-mail addresses (including written with “[at]” or encoded in a web address), phone numbers, social media profiles |
| Banking | IBAN, BIC / SWIFT, bank cards |
| Business and tax | SIREN, SIRET, VAT number (FR, BE, ES, IT, DE), UID (CH), tax number, partita IVA (IT) |
| Morocco | national identity card (CIN, CNIE), ICE, CNSS registration, phone numbers |
| West Africa and OHADA | RCCM (17 OHADA countries), NINEA (Senegal), NCC taxpayer account and NNI (Côte d’Ivoire), identity card, CNPS, IPRES, CSS registration |
| United States | SSN, ITIN, EIN, phone numbers |
| Technical and vehicles | IP addresses (v4 and v6), technical secrets (API keys, tokens, passwords, private keys, connection strings), GPS coordinates, number plates |
| Tables | names under a “Name”, “First name”, “Client”, “Employee”… column header (CSV, Excel) |
| Your own types | customer number, employee number… (level 4) |
Appendix B — Frequently asked questions
| Situation | What to do |
|---|---|
| Nothing is masked on paste | Check “Protection on” and the site’s state at the top of the panel; reload the page if the extension has just been installed. |
| Names are not masked | The model is downloading or unavailable: see Settings › Engine. Other data is still masked. |
| The “Show real values” button does not appear | Wait for the answer to finish, or use Alt+Shift+V or right-click; otherwise, Texts › Restore real values in a text. |
| The copied text contains tokens | The site’s “Copy” button copies what the site knows: use Copy with real values, or show the real values then press Ctrl+C. |
| “No known value for these tokens” | The answer comes from another conversation, or the mappings have expired or been deleted. For a project, use a workspace. |
| The paste is blocked | Paste into the site’s main message box, or turn ChatMasqué off for that site (level 2). |
| New computer or new browser | Restore your backup with its passphrase, then reopen the conversations. |
| A common word is masked by mistake | Untick it in the preview, add it to Never mask, or raise the threshold. |
| Some data is not masked | In the input box: right-click, Mask the selection. Then add it to Always mask; if it comes up often in varying forms, create a custom entity. |
| An image contains sensitive information | Black it out in the window that opens before sending; if it does not open, check Settings › Settings › Pasted or dropped images. |
| End of an assignment | Purge the workspace (Projects › Workspaces): its mappings are erased. |
Appendix C — Short glossary
| Word | Meaning |
|---|---|
| Token | label that replaces a piece of data in the text sent: [PERSONNE_1], [EMAIL_2]… |
| Mapping | the link between a token and its real value, kept encrypted on your computer |
| Conversation | the normal scope of mappings: a conversation’s tokens only apply to it |
| Workspace | a scope shared by a whole project, with no time limit |
| Stand-in | a plausible fake name used instead of a token |
| Preview | the window that shows, before pasting, what the AI will receive |
| Model | the program, downloaded once, that recognises names, places and organisations on your computer |